Follow the Data

A data driven blog

Archive for the tag “Google”

Modelling tabular data with Google’s TabNet

Released in 2019, Google Research’s TabNet is claimed in a preprint manuscript to outperform existing methods on tabular data. How does it work and how can one try it?

Tabular data probably make up the majority of business data today. Think of things like retail transactions, click stream data, temperature and pressure sensors in factories, KYC information… the variety is endless.

In another post, I introduced CatBoost, one of my favorite methods for building prediction models on tabular data, and its neural network counterpart, NODE. But around the same time as the NODE manuscript came out, Google Research released a manuscript taking a totally different approach to tabular data modelling with neural networks. Whereas NODE mimics decision tree ensembles, Google’s proposed TabNet tries to build a new kind of architecture suitable for tabular data.

The paper describing the method is called TabNet: Attentive Interpretable Tabular Learning, which nicely summarizes what the authors are trying to do. The “Net” part tells us that it is a type of neural network, the “Attentive” part implies it is using an attention mechanism, it aims to be interpretable, and it is used for machine learning on tabular data.

How does it work?

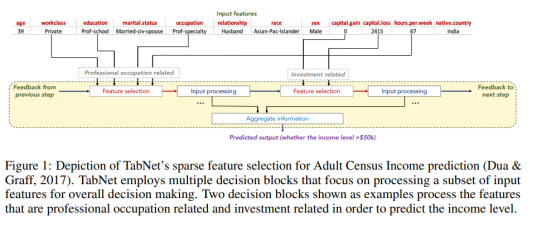
TabNet uses a kind of soft feature selection to focus on just the features that are important for the example at hand. This is accomplished through a sequential multi-step decision mechanism. That is, the input information is processed top-down in several steps. As the manuscript puts it, The idea of top-down attention in sequential form is inspired from its applications in processing visual and language data such as for visual question answering (Hudson & Manning, 2018) or in reinforcement learning (Mott et al., 2019) while searching for a small subset of relevant information in high dimensional input.

The building blocks for performing this sequential attention are called transformer blocks even though they are a bit different from the transformers used in popular NLP models such as BERT. The soft feature selection is accomplished by using the sparsemax function.

The first figure from the paper, reproduced below, sketches how information is aggregated to form a prediction.

Screenshot from 2020-01-13 21-55-05

One nice property of TabNet is that it does not require feature preprocessing (in contrast to e.g. NODE). Another one is that it has interpretability built in “for free” in that the most relevant features are selected for each example. This means that you don’t have to apply an external explanation module such as shap or LIME.

It is not so easy to wrap one’s head around what is happening inside this architecture when reading the paper, but luckily there is published code which clarifies things a bit and shows that it is not as complicated as you might think.

How can I use it?


The original code and modifications

As already mentioned, the code is available, and the authors show how to use it together with the forest covertype dataset. To facilitate this, they have provided three dataset-specific files: one file that downloads and prepares the data (download_prepare_covertype.py), another one that defines the appropriate Tensorflow Feature Columns and a CSV reader input function (data_helper_covertype.py), and the file that contains the training loop (experiment_covertype.py).

The repo README states:

To modify the experiment to other tabular datasets:

– Substitute the train.csv, val.csv, and test.csv files under “data/” directory,

– Modify the data_helper function with the numerical and categorical features of the new dataset,

– Reoptimize the TabNet hyperparameters for the new dataset.

After having gone through this process a couple of times with other datasets, I decided to write my own wrapper code to streamline the process. This code, which I must stress is a totally unofficial fork, is on GitHub.

In terms of the README points above:

  • Rather than making new train.csv, val.csv and test.csv files for each dataset, I preferred to read the entire dataset and do the splitting in-memory (as long as it is feasible, of course), so I wrote a new input function for Pandas in my code.
  • It can take a bit of work to modify the data_helper.py file, at least initially when you aren’t quite sure what it does and how the feature columns should be defined (this was certainly the case with me). There are also many parameters which need to be changed but which are in the main training loop file rather than the data helper file. In view of this, I also tried to generalize and streamline this process in my code.
  • I added some quick-and-dirty code for doing hyperparameter optimization, but so far only for classification.
  • It is also worth mentioning that the example code from the authors only shows how to do classification, not regression, so that extra code also has to be written by the user. I have added regression functionality with a simple mean squared error loss.

Using the command-line interface

Execute a command like:

python train_tabnet.py \
  --csv-path data/adult.csv \
  --target-name "<=50K" \
  --categorical-features workclass,education,marital.status,\
occupation,relationship,race,sex,native.country\
  --feature_dim 16 \
  --output_dim 16 \
  --batch-size 4096 \
  --virtual-batch-size 128 \
  --batch-momentum 0.98 \
  --gamma 1.5 \
  --n_steps 5 \
  --decay-every 2500 \
  --lambda-sparsity 0.0001 \
  --max-steps 7700

The mandatory parameters are — -csv-path(pointing to the location of the CSV file),--target-name(the name of the column with the prediction target) and--categorical-featues (a comma-separated list of the features that should be treated as categorical). The rest of the input parameters are hyperparameters that need to be optimized for each specific problem. The values shown above, though, are taken directly from the TabNet manuscript, so they have already been optimized for the Adult Census dataset by the authors.

By default, the training process will write information to the tflog subfolder of the location where you execute the script. You can point tensorboard at this folder to look at training and validation stats:

tensorboard --logdir tflog

and point your web browser to localhost:6006.

If you don’t have a GPU…

… you could try this Colaboratory notebook. Note that if you want to look at the Tensorboard logs, your best bet is probably to create a Google Storage bucket and have the script write the logs there. This is accomplished by using the tb-log-locationparameter. E.g. if your bucket’s name were camembert-skyscrape, you could add--tb-log-location gs://camembert-skyscraperto the invocation of the script. (Note, though, that you have to set the permissions for the storage bucket correctly. This can be a bit of a hassle.)

Then you can point tensorboard, from your own local computer, to that bucket:

tensorboard --logdir gs://camembert-skyscraper

Hyperparameter optimization

There is also a quick-and-dirty script for doing hyperparameter optimization in the repo (opt_tabnet.py). Again, an example is shown in the Colaboratory notebook. The script only works for classification so far, and it is worth noting that some training parameters are still hard-coded although they shouldn’t really be (for example, the patience parameter for early stopping [how many steps do you continue while the best validation accuracy does not improve].)

The parameters that are varied in the optimization script are N_steps, feature_dim, batch-momentum, gamma, lambda-sparsity. (output_dim is set to be equal to feature_dim, as suggested in the optimization tips just below.)

The paper has the following tips on hyperparameter optimization:

Most datasets yield the best results for N_steps ∈ [3, 10]. Typically, larger datasets and more complex tasks require a larger N_steps. A very high value of N_steps may suffer from overfitting and yield poor generalization.

Adjustment of the values of Nd [feature_dim] and Na [output_dim] is the most efficient way of obtaining a trade-off between performance and complexity. Nd = Na is a reasonable choice for most datasets. A very high value of Nd and Na may suffer from overfitting and yield poor generalization.

An optimal choice of γ can have a major role on the overall performance. Typically a larger N_steps value favors for a larger γ.

A large batch size is beneficial for performance — if the memory constraints permit, as large as 1–10 % of the total training dataset size is suggested. The virtual batch size is typically much smaller than the batch size.

Initially large learning rate is important, which should be gradually decayed until convergence.

Results

I’ve tried TabNet via this command line interface for several datasets, including the Adult Census dataset that I used in the post about NODE and CatBoost for reasons that can be found in that post. Conveniently, this dataset had also been used in the TabNet manuscript, and the authors present the best parameter settings they found there. With repeated runs using those setting, I noticed that the best validation error (and test error) tends to be at around 86%, similar to CatBoost without hyperparameter tuning. The authors report a test set performance of 85.7% in the manuscript. When I did hyperparameter optimization with hyperopt, I unsurprisingly reached a similar performance around 86%, albeit with a different parameter setting.

For other datasets such as the Poker Hand dataset, TabNet is claimed to beat other methods by a considerable margin. I have not yet devoted much time to that, but everyone is of course invited to try TabNet with hyperparameter optimization on various datasets for themselves!

Conclusions

TabNet is an interesting architecture that seems promising for tabular data analysis. It operates directly on raw data and uses a sequential attention mechanism to perform explicit feature selection for each example. This property also gives it a sort of built-in interpretability.

I have tried to make TabNet slightly easier to work with by writing some wrapper code around it. The next step is to compare it to other methods across a wide range of datasets.

Please try it on your own datasets and/or send pull requests and help me improve the interface if you are interested!


Notes on genomics APIs #2: Google Genomics API

This is the second in a series of about three posts with notes on different genomics APIs. The first post, which was about the One Codex API, can be found here.

As you may have heard, Google has started building an ambitious infrastructure for storing and querying genomic data, so I was eager to start exploring it. However, as there were a number of tools available, I initially had some trouble wrapping my head around what I was supposed to do. I hope these notes, where I mainly use the API for R, can provide some help.

Some useful bookmarks:

Google Developers Console – for creating and managing Google Genomics and BigQuery projects.

Google Genomics GitHub repo

Google Cloud Platform Google Genomics page (not sure what to call this page really)

Getting started

You should start by going to the Developer Console and creating a project. You will need to give it a name, and in addition it will be given a unique ID which you can use later in API calls. When the project has been created, click “Enable an API” on the Dashboard page, and click the button where it says “OFF” next to Genomics API (you may need to scroll down to find it).

Now you need to create a client_secret.json file that you will use for some API calls. Click the Credentials link in the left side panel and then click “Create new client ID”. Select “Installed application” and fill in the “Consent screen” form. All you really need to do is select an email address and type a “product name”, like “BlogTutorial” like I did for this particular example. Select “Installed application” again if you are prompted to select an application type. Now it should display some information under the heading “Client ID for native application”. Click the “Download JSON” button and rename the file to client_secret.json. (I got these instructions from here.)

Using the Java API client for exploring the data sets

One of the first questions I had was how to find out which datasets are actually available for querying. Although it is perfectly possible to click around in the Developer Console, I think the most straightforward way currently is to use the Java API client. I installed it from the Google Genomics GitHub repo by cloning:
git clone git@github.com:googlegenomics/api-client-java.git
The GitHub repo page contains installation instructions, but I will repeat them here. You need to compile it using Maven:

cd api-client-java
mvn package

If everything goes well, you should now be able to use the Java API client to look for datasets. It is convenient (but not necessary) to put the client_secret.json file into the same directory as the Java API client. Let’s check which data sets are available (this will only work for projects where billing has been enabled; you can sign up for a free trial in which case you will not be surprise-billed):

java -jar genomics-tools-client-java-v1beta2.jar listdatasets --project_number 761052378059 --client_secrets_filename client_secret.json

(If your client_secret.json file is in another directory, you need to give the full path to the file, of course.) The project number is shown on your project page in the Developer Console. Now, the client will open a browser window where you need to authenticate. You will only need to do this the first time. Finally, the results are displayed. They currently look like this:

Platinum Genomes (ID: 3049512673186936334)
1000 Genomes - Phase 3 (ID: 4252737135923902652)
1000 Genomes (ID: 10473108253681171589)

So there are three data sets. Now let’s check which reference genomes are available:

java -jar genomics-tools-client-java-v1beta2.jar searchreferencesets --client_secrets_filename ../client_secret.json --fields 'referenceSets(id,assemblyId)'

The output is currently:

{"assemblyId":"GRCh37lite","id":"EJjur6DxjIa6KQ"}
{"assemblyId":"GRCh38","id":"EMud_c37lKPXTQ"}
{"assemblyId":"hs37d5","id":"EOSt9JOVhp3jkwE"}
{"assemblyId":"GRCh37","id":"EOSsjdnTicvzwAE"}
{"assemblyId":"hg19","id":"EMWV_ZfLxrDY-wE"}

To find out the names of the chromosomes/contigs in one of the reference genomes: (by default this will only return the ten first hits, so I specify –count 50)

java -jar genomics-tools-client-java-v1beta2.jar searchreferences --client_secrets_filename client_secret.json  --fields 'references(id,name)' --reference_set_id EMWV_ZfLxrDY-wE --count 50

Now we can try to extract a snippet of sequence from one of the chromosomes. Chromosome 9 in hg19 had the ID EIeX4KDCl634Jw, so the query becomes, if we want to extract some sequence from 13 Mbases into the chromosome:

java -jar genomics-tools-client-java-v1beta2.jar getreferencebases  --client_secrets_filename client_secret.json --reference_id ENywqdu-wbqQBA --start 13000000 --end 13000070

This returns the sequence AGGGACAGGAATTGAGATTTAGGAAGCCATCAGGACTTGGGTTTTTGTCATCCCACTCTATTTCTCTCTG.

Another thing you might want to do is to check which “read groups” that are available in one of the data sets. For instance, for the Platinum Genomes data set we get:

java -jar genomics-tools-client-java-v1beta2.jar searchreadgroupsets --dataset_id 3049512673186936334  --client_secrets_filename client_secret.json

which outputs a bunch of JSON records that show the corresponding sample name, BAM file, internal IDs, software and version used for alignment to the reference genome, etc.

Using BigQuery to search Google Genomics data sets

Now let’s see how we can call the API from R. The three data sets mentioned above can be queried using Google’s BigQuery interface, which allows SQL-like queries to be run on very large data sets. Start R and install and load some packages:

install.packages("devtools") # unless you already have it!
library("devtools")
devtools::install_github("hadley/assertthat")
devtools::install_github("hadley/bigrquery")
library("bigrquery")

Now we can access BigQuery through R. Try one of the non-genomics data sets just to get warmed up.

project <- '(YOUR_PROJECT_ID)' # the ID of the project from the Developer Console
sql <- 'SELECT title,contributor_username,comment FROM[publicdata:samples.wikipedia] WHERE title contains "beer" LIMIT 100;'
data <- query_exec(sql, project)

Now the data object should contain a list of Wikipedia articles about beer. If that worked, move on to some genomic queries. In this case, I decided I wanted to look at the SNP for the photic sneeze reflex (the reflex that makes people such as myself sneeze when they go out on a sunny day) that 23andme discovered via their user base. That genetic variant has the ID and is located on chromosome 2, base 146125523 in the hg19 reference genome. It seems that 23andme uses a 1-based coordinate system (the first nucleotide has the index 1) while Google Genomics uses a 0-based system, so we should look for base position 146125522 instead. We query the Platinum Genomes variant table: (you can find the available tables at the BigQuery Browser Tool Page)

sql <- 'SELECT reference_bases,alternate_bases FROM[genomics-public-data:platinum_genomes.variants] WHERE reference_name="chr2" AND start=146125522 GROUP BY reference_bases,alternate_bases;'
query_exec(sql, project)

This shows the following output:

reference_bases alternate_bases
1 C T

This seems to match the description provided by 23andme; the reference allele is C and the most common alternate allele is T. People with CC have slightly higher odds of sneezing in the sun, TT people have slightly lower odds, and people with CT have average odds.

If we query for the variant frequencies (VF) in the 13 Platinum genomes, we get the following results (the fraction represents, as I interpret it, the fraction of sequencing reads that has the “alternate allele”, in this case T):

sql <- 'SELECT call.call_set_name,call.VF FROM[genomics-public-data:platinum_genomes.variants] WHERE reference_name="chr2" AND start=146125522;'
query_exec(sql, project)

The output is as follows:

call_call_set_name call_VF
1 NA12882 0.500
2 NA12877 0.485
3 NA12889 0.356
4 NA12885 1.000
5 NA12883 0.582
6 NA12879 0.434
7 NA12891 1.000
8 NA12888 0.475
9 NA12886 0.434
10 NA12884 0.459
11 NA12893 0.588
12 NA12878 0.444
13 NA12892 0.533

So most people here seem to have a mix of C and T, with two individuals (NA12891 and NA12885) having all T:s, in other words they appear to be homozygous for the T allele, if I am interpreting this correctly.

Using the R API client

Now let’s try to use the R API client. In R, install the client from GitHub, and also ggbio and ggplot2 if you don’t have them already:

source("http://bioconductor.org/biocLite.R")
biocLite("ggbio")
devtools::install_github("googlegenomics/api-client-r")
install.packages("ggplot2")
library("GoogleGenomics")
library("ggbio")
library("ggplot2")

First we need to authenticate for this R session:

authenticate(file="/path/to/client_secret.json") # substitute the actual path to your client_secret.json file

The Google Genomics GitHub repo page has some examples on how to use the R API. Let’s follow the Plotting Alignments example.

reads <- getReads(readGroupSetId="CMvnhpKTFhDyy__v0qfPpkw",
chromosome="chr13",
start=33628130,
end=33628145)

This will fetch reads corresponding to the given genomic interval (which turns out to overlap a gene called KL) in the read group set called CMvnhpKTFhDyy__v0qfPpkw. By applying one of the Java API calls shown above and grepping for this string, I found out that this corresponds to a BAM file for a Platinum Genomes sample called NA12893.

We need to turn thereadslist into a GAlignment object:

alignments <- readsToGAlignments(reads)

Now we can plot the read coverage over the region using some ggbio functions.

alignmentPlot <- autoplot(alignments, aes(color=strand,fill=strand))
coveragePlot <- ggplot(as(alignments, 'GRanges')) + stat_coverage(color="gray40", fill="skyblue")
tracks(alignmentPlot, coveragePlot, xlab="Reads overlapping for NA12893")

coverage_plot
As in the tutorial, why not also visualize the part of the chromosome where we are looking.

ideogramPlot <- plotIdeogram(genome="hg19", subchr="chr13")
ideogramPlot + xlim(as(alignments, 'GRanges'))

ideogram

Now you could proceed with one of the other examples, for instance the variant annotation comparison example, which I think is a little bit too elaborate to reproduce here.

Data data data

I haven’t used Google Plus much since I signed up this summer but that is changing now after they launched the “communities” concept and I found the Data data data and Machine Learning communities, where a lot of interesting discussions can be found by “big names” and “smart unknowns” alike. Check them out if you haven’t done so.

Machine learning

While preparing for our next podcast recording, here are some interesting recent machine learning developments.

The Protocols and Structures for Inference (PSI) project aims to develop an architecture for presenting machine learning algorithms, their inputs (data) and outputs (predictors) as resource-oriented RESTful web services in order to make machine learning technology accessible to a broader range of people than just machine learning researchers.

Why?

Currently, many machine learning implementations (e.g., in toolkits such as Weka, Orange, Elefant, Shogun, SciKit.Learn, etc.) are tied to specific choices of programming language, and data sets to particular formats (e.g., CSV, svmlight, ARFF). This limits their accessability [sic], since new users may have to learn a new programming language to run a learner or write a parser for a new data format, and their interoperability, requiring data format converters and multiple language platforms.

I think it seems promising. The specification is here.

  • BigML, which has been mentioned in passing on this blog, has now published some videos of what the interface actually looks like. It seems quite nice. While watching the videos, I was thinking “OK, this looks really nice, but does it have an API?” Luckily, it turns out that it has, which is good news for us geekier people who don’t just want to use the GUI.
  • Machine learning in Google Goggles. A video describing some real cutting-edge ML research in Google’s augmented reality glasses, Google Goggles. Definitely worth checking out.

Google Prediction API open to all

I’ve been eagerly waiting to use the Google Prediction API ever since it was announced, and now (since sometime in May) it’s open for everyone who has a Google account (and a credit card). Previously, you had to be able to provide a U.S. mailing address.

Google’s Prediction API is basically a nice way to run your classification and/or prediction tasks through Google’s black-box set of machine learning tools. The way it works is that you upload your training data to Google Storage, which is something like Google’s version of Amazon’s S3: a cloud-based storage system where you store your data in “buckets”. (Google Storage, like S3, uses the term bucket and, also like S3, requires that bucket names only use lower-case letters.) You can activate both Google Storage and the Prediction API from the Google APIs Console. This is also where you will find (click “API access” on the left hand menu) the access key that you will need to run prediction tasks. You’ll have to give credit card details to pay for potential future usage.

The training examples that you put in Storage need to be formatted according to the specification in the Developer’s Guide. Once they have been uploaded, you can train a model on the uploaded data, make predictions about new examples, update existing models and more using one of the client libraries or even simpler, just by copying some of the bash scripts shown on the same page (hidden behind ‘+’ signs which can be expanded.) For these bash scripts to work as written on that page, you need to paste your API key into a file called ‘googlekey’ located in the directory from where you are running the script.

I used this walkthrough example about cancer classification from gene expression data to get up to speed on how Google Prediction API works. Now I’m thinking about what data to throw at it next. Perhaps it would be fun to input some Kaggle contest data sets into it as a kind of “Google baseline” predictor? 🙂

Far-out stuff

Some science fiction-type nuggets from the past few weeks:

Google does machine learning using quantum computing. Apparently, a “quantum algorithm” called Grover’s algorithm can search an unsorted database in O(√N) time. The Google blog explains this in layman’s terms:

Assume I hide a ball in a cabinet with a million drawers. How many drawers do you have to open to find the ball? Sometimes you may get lucky and find the ball in the first few drawers but at other times you have to inspect almost all of them. So on average it will take you 500,000 peeks to find the ball. Now a quantum computer can perform such a search looking only into 1000 drawers.

I’ve absolutely no clue how this algorithm works – although I did take an introductory course in quantum mechanics many a moon ago, I’ve forgotten everything about it and the course probably didn’t go deep enough to explain it anyway. Google are apparently collaborating with a Canadian company called D-Wave, who develop hardware for realizing something called a “quantum adiabatic algorithm” by “magnetically coupling superconducting loops”. It is interesting that D-Wave are explicitly focusing on machine learning; the home page states that “D-Wave is pioneering the development of a new class of high-performance computing system designed to solve complex search and optimization problems, with an initial emphasis on synthetic intelligence and machine learning applications.”

Speaking of synthetic intelligence, the winter issue of H+ Magazine contains an article by Ben Goertzel where he discusses the possibility that the first artificial general intelligence will arise in China. The well-known AI researcher Hugo de Garis, who runs a lab in Xiamen in China, certainly believes that this will happen. In his words:

China has a population of 1.3 billion. The US has a population of 0.3 billion. China has averaged an economic growth rate of about 10% over the past 3 decades. The US has averaged 3%. The Chinese government is strongly committed to heavy investment into high tech. From the above premises, one can virtually prove, as in a mathematical theorem, that China in a decade or so will be in a superior position to offer top salaries (in the rich Southeastern cities) to creative, brilliant Westerners to come to China to build artificial brains — much more than will be offered by the US and Europe. With the planet‘s most creative AI researchers in China, it is then almost certain that the planet‘s first artificial intellect to be built will have Chinese characteristics.

Some other arguments in favor of this idea mentioned in the article are that “One of China‘s major advantages is the lack of strong skepticism about AGI resulting from past failures” and that China “has little of the West‘s subliminal resistance to thinking machines or immortal people”.

(By the way, the same issue contains a good article by Alexandra Carmichael on subjects frequently discussed on this blog. The most fascinating detail from that article, to me, was when she mentions “self-organized clinical trials“; apparently users of PatientsLikeMe with ALS had set up their own virtual clinical trial where some of them started to take lithium and some didn’t, after which the outcomes were compared.)

Finally, I thought this methodology for tagging images with your mind was pretty neat. This particular type of mind reading does not seem to have reached a high specificity and sensitivity yet, but that will improve in time.

Predictions from Google search data

Google has started reporting some interesting findings about predictions based on web search data. I would guess that these things have been in the works for several years before Google went public with them.

Last year, they introduced Google Flu Trends, which basically monitors influenza-related searches and tries to predict outbreaks early by identifying geographical location that are suddenly showing a strong increase in such searches. An article describing the system was even published in the very high-profile scientific journal Nature. (Later, people started to use Twitter for flu monitoring.)

Lately, the official Google research blog has started to write about the possibilities of using Google search data to predict economic variables in the short term. A recent analysis they did, based on claims for unemployment benefits  in the U.S., seems to suggest that the U.S. economy is recovering.

From the blog post:

One of the strongest leading indicators of economic activity is the number of people who file for unemployment benefits. Macroeconomists Robert Gordon and James Hamilton have recently examined the historical evidence. According to Hamilton’s summary: “…in each of the last six recessions, the recovery began within 8 weeks of the peak in new unemployment claims.”

Let’s see if the prediction comes true!

The analysis is described in more detail in this paper.

Post Navigation